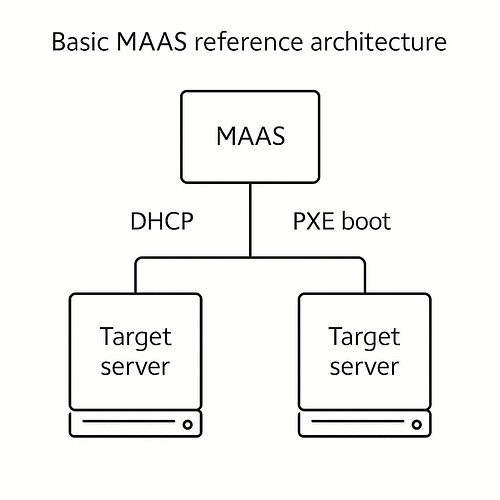
One way to try MAAS is to have a separate network with a switch, router, and several servers. One runs MAAS, the rest are targets for provisioning. In this tutorial, we automate all of this in a virtual machine with Multipass and use LXD to simulate machines MAAS can control. The setup looks something like this:
Build a MAAS and LXD environment in 30 minutes with Multipass on Ubuntu
1. A potential MAAS test setup
2. 1. Setting up Multipass and launching the VM
Multipass is a Canonical tool that simplifies the creation of virtual machines. This tutorial uses Multipass to build a self-contained VM that hosts both MAAS and an LXD environment.
Requirements:
- Ubuntu 18.04 LTS or higher, or Windows with Hyper-V
- 16 GB RAM, 4-core CPU with virtualization support (VT or AMD-V)
- 30 GB free disk space
If you already have MAAS running locally, stop it:
sudo snap stop maas
Install and verify Multipass:
sudo snap install multipass
multipass launch --name foo
multipass exec foo -- lsb_release -a
multipass delete --purge foo
Check for virtualization support:
sudo apt install cpu-checker
kvm-ok
Output should include:
INFO: /dev/kvm exists
KVM acceleration can be used
Launch the MAAS + LXD VM:
wget -qO- https://raw.githubusercontent.com/canonical/maas-multipass/main/maas.yml \
  | multipass launch --name maas -c4 -m8GB -d32GB --cloud-init -
Confirm launch:
multipass list
Two IP addresses should be visible. One is internal (10.10.10.1), used by MAAS and LXD, and the other is for accessing MAAS from your host.
3. 2. Installing and configuring MAAS within the VM
Visit MAAS in your browser:
http://<MAAS_IP>:5240/MAAS
Login credentials:
- Username:
admin - Password:
admin
Walkthrough steps:
- Confirm or set DNS (default: 8.8.8.8)
- Continue past boot image import message (MAAS handles it automatically)
- Skip SSH key screen (already set up in VM)
Verification in MAAS UI:
- KVM > LXD: confirms the LXD host is available
- Controllers: both rack and region controllers visible with green status
- Images: wait for them to sync (1 GB+ download)
4. 3. Setting up LXD and creating virtual machines
Once the MAAS setup is verified:
Create a nested VM guest:
- Navigate to KVM > LXD > Select host > Add VM
- Fill in:
- Hostname:
AwesomeVM1 - RAM:
8000 MiB - Storage:
8000 MiB - CPU:
2 cores
- Hostname:
- Click Compose machine
The VM will show in the Machines tab and automatically begin commissioning.
5. 4. Commissioning and deploying machines using MAAS
Commission the VM:
- Monitor status in Machines tab → “Commissioning” → “Ready”
Deploy Ubuntu:
- Select machine → Actions > Deploy
Confirm deployment:
multipass shell maas
ping <AwesomeVM1_IP>
ssh ubuntu@<AwesomeVM1_IP>
ping ubuntu.com
This confirms successful deployment and internet access.
6. Summary
In this tutorial, we:
- Installed Multipass and launched a nested MAAS VM
- Set up and configured MAAS via browser UI
- Created nested LXD VMs
- Commissioned and deployed Ubuntu to them with MAAS
- Verified VM guest functionality via SSH and ping
7. Next steps
Explore editing the maas.yml file to fine-tune VM parameters. You can also expand this setup to a real physical environment or explore more advanced features of MAAS like tagging, scripts, and custom commissioning flows.
You may also want to try using a local copy of MAAS with real hardware, which is a much simpler architecture:
If you’re brave, you can try that in your homelab, with some simple, off-the-shelf NUCs or mini-PCs, using the instructions found in this GitHub repository.
Learn more at: https://maas.io
Thank you for your feedback.


